How to Set Up an IKEv2 Point-to-Site VPN with strongMan — the Web UI for strongSwan
In a previous blog post, I showed you guys how to install strongMan on Ubuntu 22.04 in order to manage your strongSwan instance via a web UI. In this article, I will show you how to use that same strongMan web app to create an IKEv2 Point-to-Site VPN connection. This will allow your remote users to connect to your VPN network. I will then show you how to establish the VPN connection from a Windows client.
Requirements
Obviously, to follow up with this article, You need to have strongMan installed. If you didn’t yet, I suggest you to take a look at my strongMan installation guide for Ubuntu 22.04.
Now let’s get started! 🚀
Create a certificate authority
StrongSwan uses certificates for authenticating both the VPN server and clients. A Certificate Authority (CA) is used to issue certificates for these entities. So we need to generate a Certificate Authority and server certificates.
To do so, we will use the strongswan-pki package provided by strongSwan. If you installed strongMan following my setup guide, then you’re already ready to go. Otherwise, you have to install the package manually. strongswan-pki package isn’t required to be installed on the VPN server (the server running both strongMan & strongSwan). You can install it on your local machine or any Linux machine and generate the required certificates there.
On Ubuntu, the installation can be done with:
apt install strongswan-pki -y
Since I already have it on my strongSwan server, I will connect to the server terminal and use it.
First, we need to create a directory to store all the certificates we will generate in this section:
mkdir -p ~/pki/{cacerts,certs,private}
Generate CA private key
Let’s execute the following command to generate a root key that will be used to sign the root Certificate Authority certificate:
pki --gen --type rsa --size 4096 --outform pem > ~/pki/private/ca-key.pem
- This command generates an RSA private key for the Certificate Authority (CA) with a key size of 4096 bits.
- The private key is saved in the
~/pki/private/ca-key.pemfile in PEM format.
Generate CA certificate
We will use the command below to generate the CA certificate:
pki --self --ca --lifetime 3650 --in ~/pki/private/ca-key.pem --type rsa --dn "CN=StrongSwan VPN Root CA" --outform pem > ~/pki/cacerts/ca-cert.pem
- This command creates a self-signed CA certificate.
- It sets the CA certificate’s lifetime to 3650 days (10 years). Feel free to choose the lifetime you want. 10 years sound good to me.
- The CA private key used for signing is read from
~/pki/private/ca-key.pem. - The distinguished name (DN) for the CA is set to
CN="StrongSwan VPN Root CA". You can change the CN field to anything you want. There’s no specific constraint for this. Type a relevant name to you. - The resulting CA certificate is saved in the
~/pki/cacerts/ca-cert.pemfile in PEM format.
Generate server certificate
Now that we have a Certificate Authority, we can use it to issue a certificate for the VPN server. The server certificate will be used to secure communication between the VPN server and clients.
Generate server Private Key
First, we need to generate a private key. The following command will do the job:
pki --gen --type rsa --size 4096 --outform pem > ~/pki/private/server-key.pem
- This command generates a new RSA private key for the VPN server with a key size of 4096 bits.
- The private key is saved in the
~/pki/private/server-key.pemfile in PEM format.
Generate the server certificate
We can now move to the server certificate generation with the command:
pki --pub --in ~/pki/private/server-key.pem --type rsa | pki --issue --lifetime 1825 --cacert ~/pki/cacerts/ca-cert.pem --cakey ~/pki/private/ca-key.pem --dn "CN=147.182.193.183" --san 147.182.193.183 --san @147.182.193.183 --flag serverAuth --flag ikeIntermediate --outform pem > ~/pki/certs/server-cert.pem
Here’s the breakdown of what it does:
- This set of commands generates a public key from the previously generated server private key.
- It then issues a server certificate signed by the CA.
- The certificate has a lifetime of 1825 days (5 years). Once again, you can choose any lifetime value you want.
- The CA certificate used for signing is read from
~/pki/cacerts/ca-cert.pem, and the CA private key is read from~/pki/private/ca-key.pem. - The certificate’s distinguished name (DN) is set to “CN=147.182.193.183”, and it includes Subject Alternative Names (SAN) for the IP address “147.182.193.183”.
- Where
147.182.193.183is the public IP address of my VPN server. You need to replace that with your VPN server’s IP or DNS name.
- Where
- Flags like
serverAuthandikeIntermediateare set to indicate the purpose of the certificate. The resulting server certificate is saved in the~/pki/certs/server-cert.pemfile in PEM format.
Note: That extra
--san @147.182.193.183isn’t required when using a Domain name instead of an IP address.
Now that we got all the certificates, we can move to strongMan configuration. That’s in fact the whole purpose of this article.
Configure the VPN via strongMan
Log in the strongMan web app.
Upload certificates
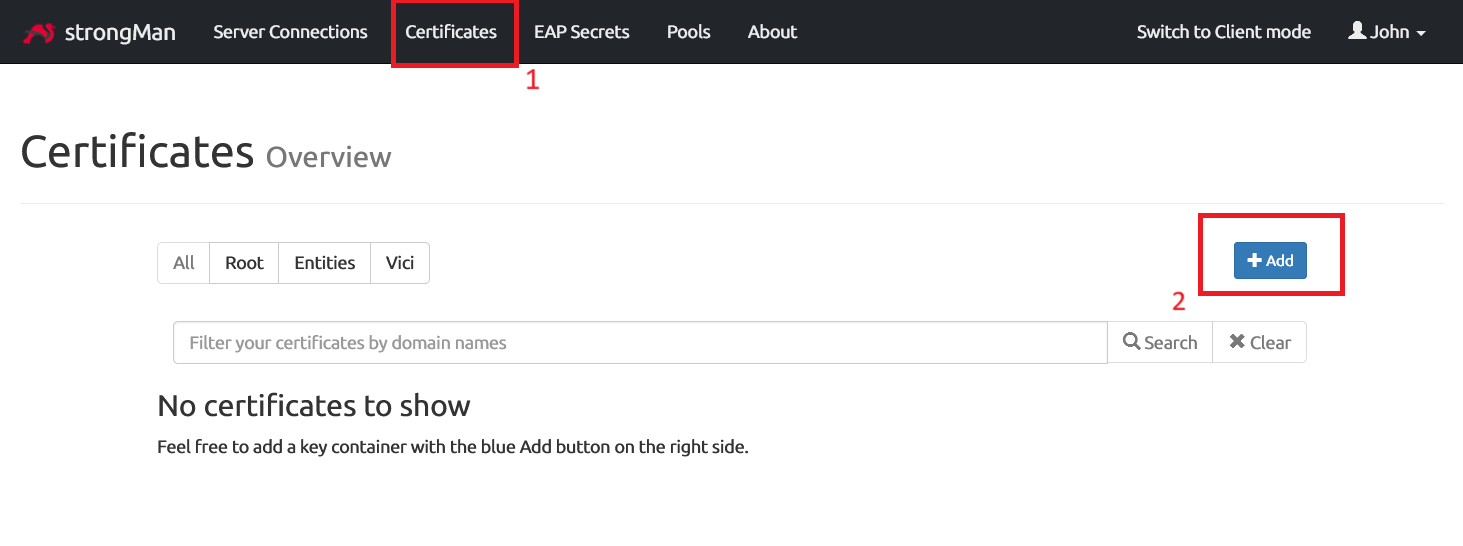
We need to import the server certificate generated previously into the strongMan application by navigating to the Certificates section and clicking on Add button.
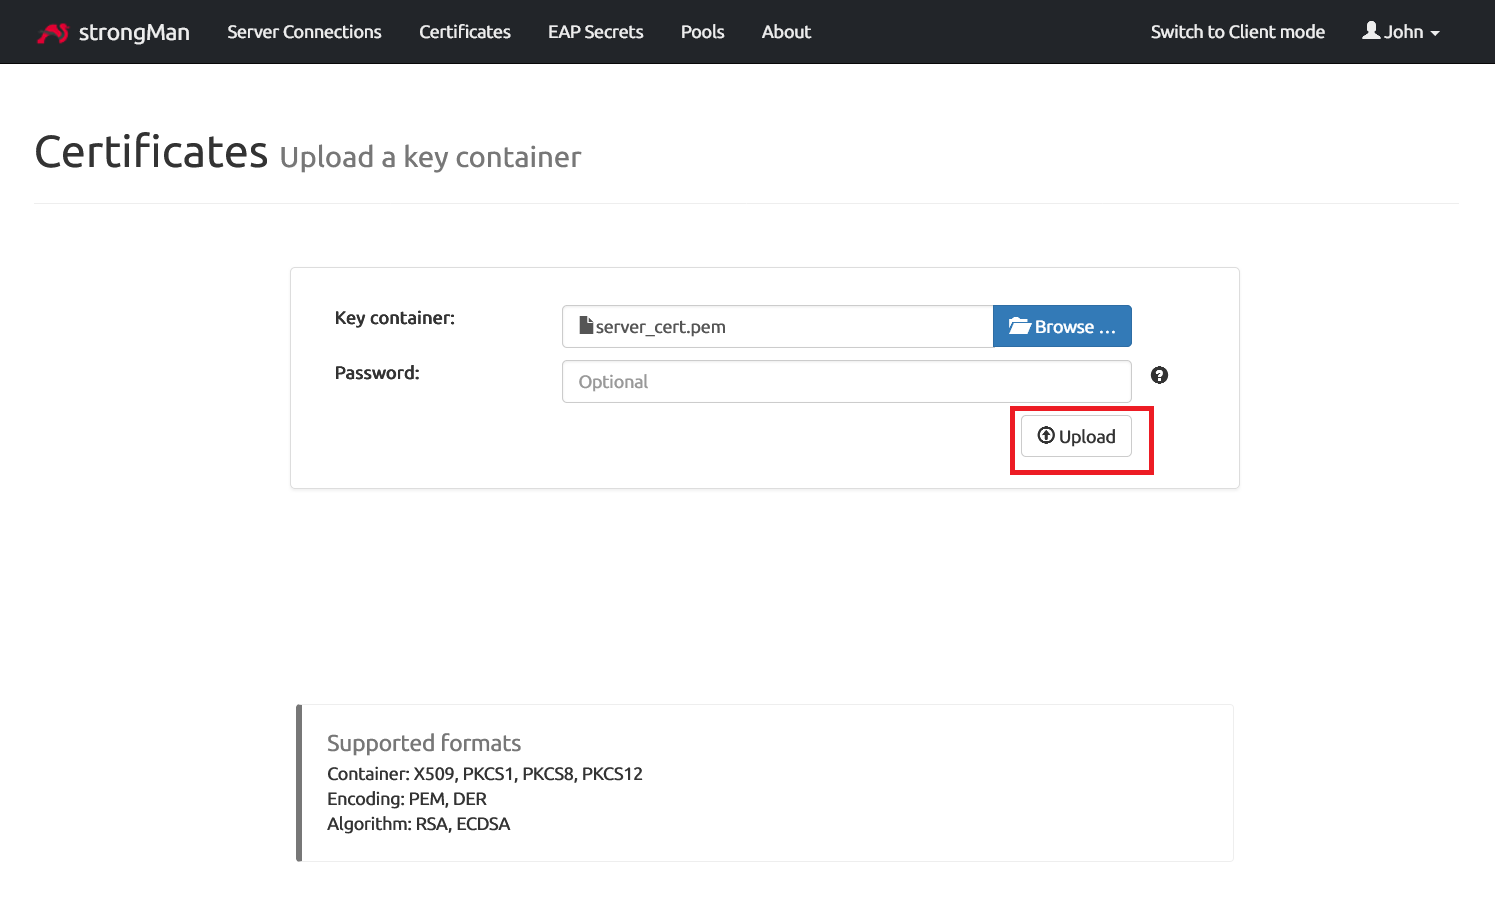
We browse and select the server certificate (server-cert.pem) file to upload it.
Not only that, but we also need to upload the server private key by selecting the server-key.pem file.
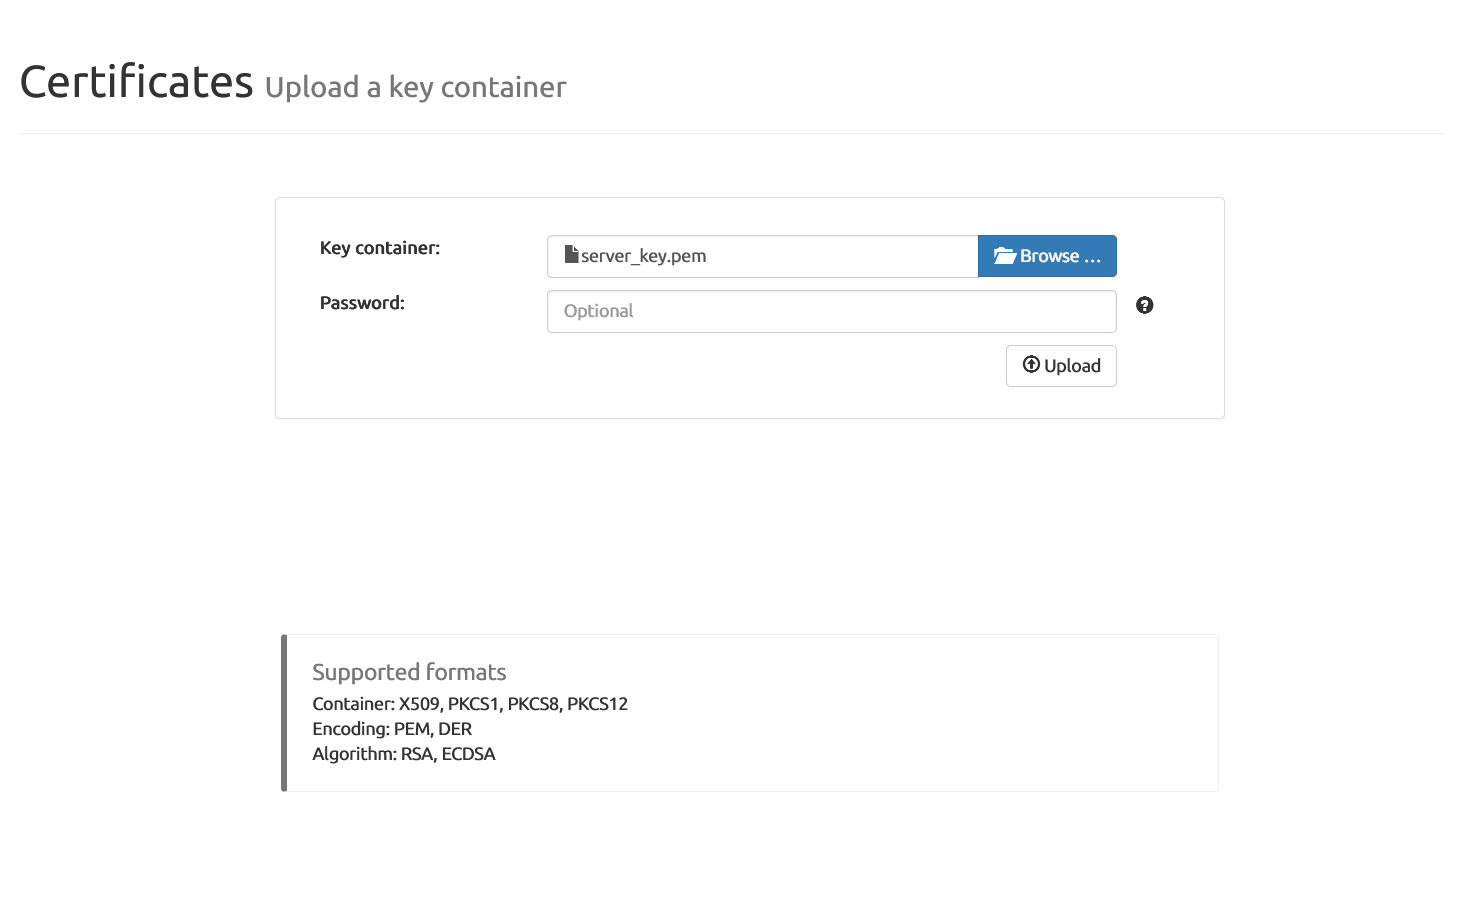
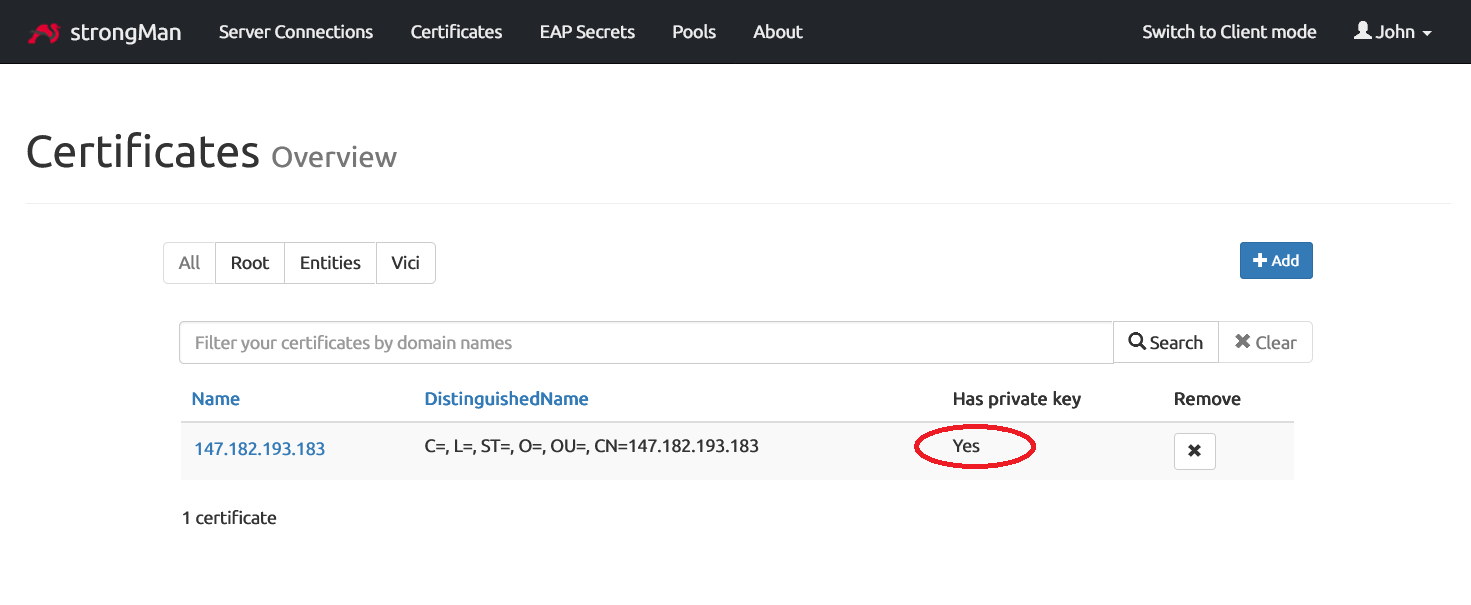
Note: You have to respect that order: The certificate first, then the private key after. StrongMan will automatically associate the private key to its certificate.
On the certificates overview page, you can see:
Create a Pool
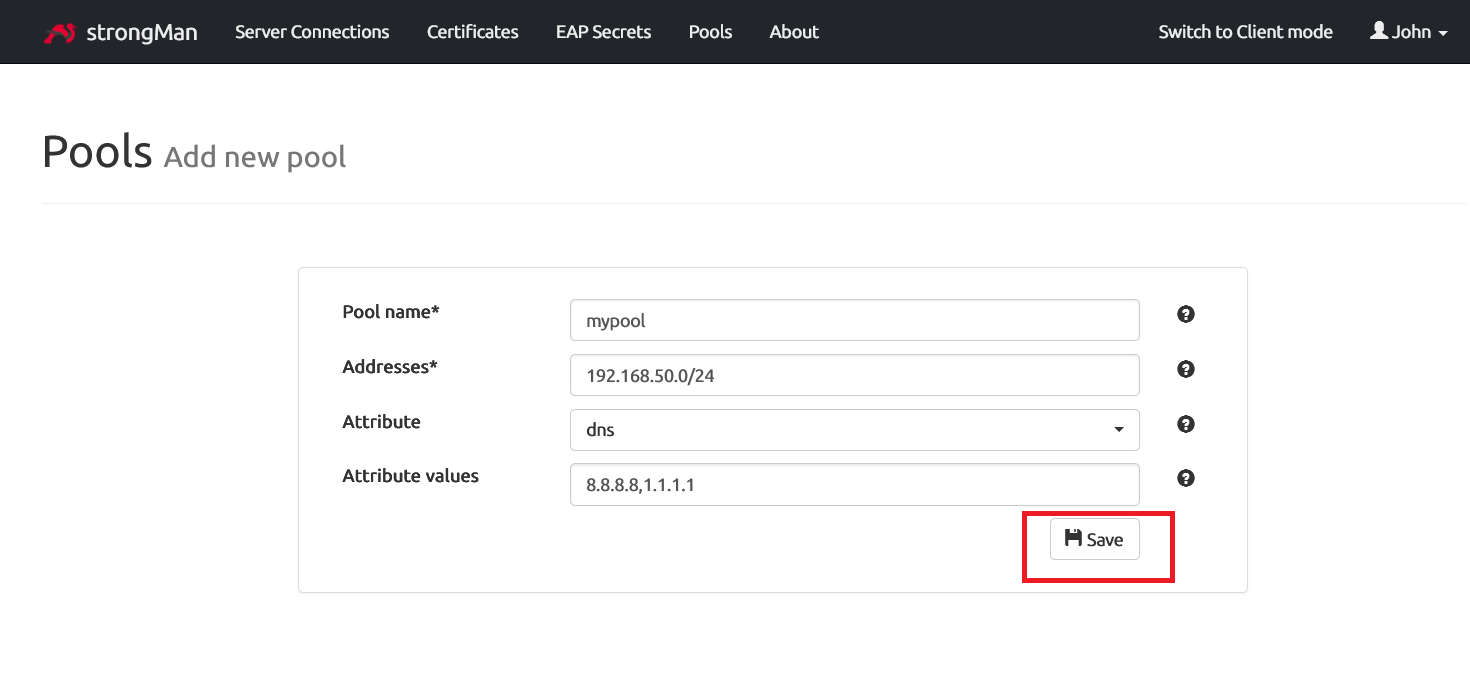
Let’s create a pool by navigating to the Pools section and clicking on Add button.

Fill in the form with the details
- Pool name: Type any relevant name you want.
- Addresses: The IP address range that will be assigned to clients connected to the VPN server
- Attribute: Select DNS to configure the DNS server that will be assigned to clients when connected through the VPN. Based on my personal experience, I noticed that users can’t access to Internet if this isn’t configured.
- Attribute values: In the example below, we use Google and Cloudflare DNS. You can choose any DNS server you wish.
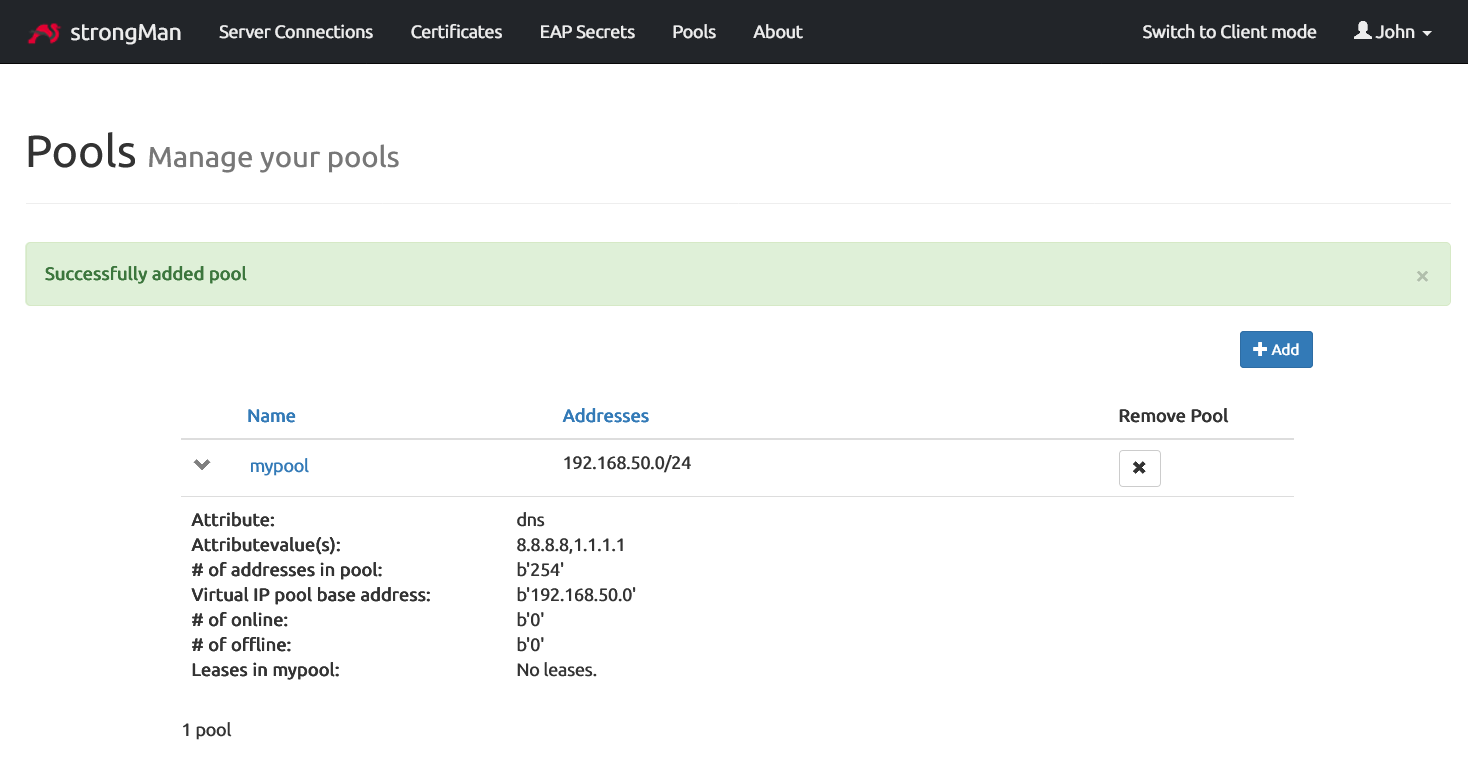
A success notification message will show up after we hit the Save button.
Set Extensible Authentication Protocol (EAP) secrets
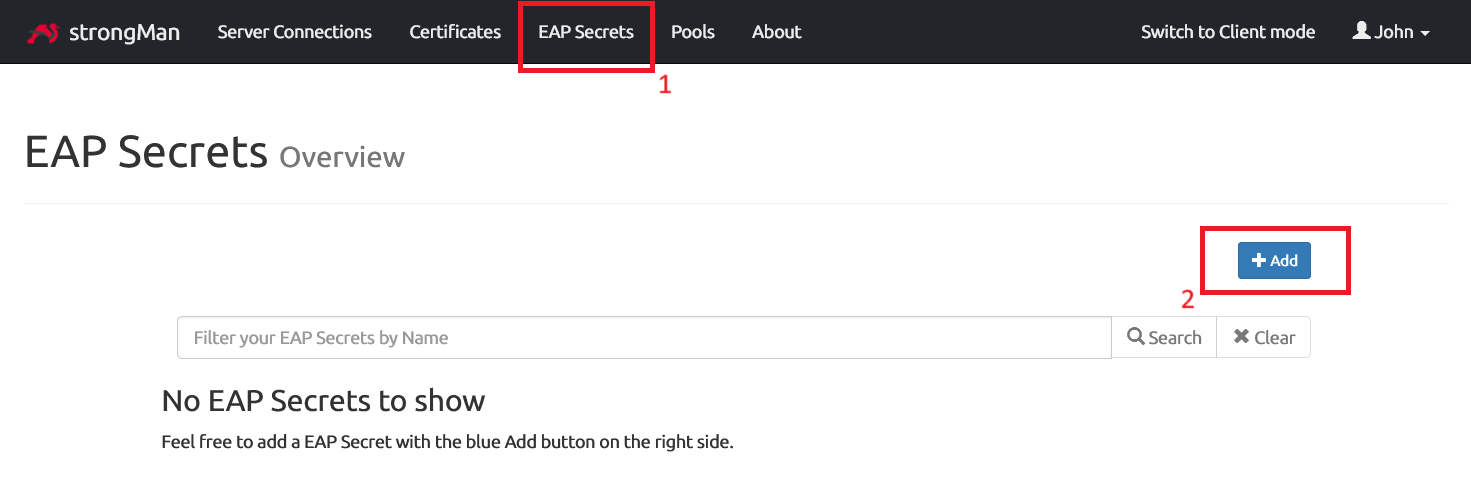
We should now set the EAP secrets that users will use to authenticate to the VPN.
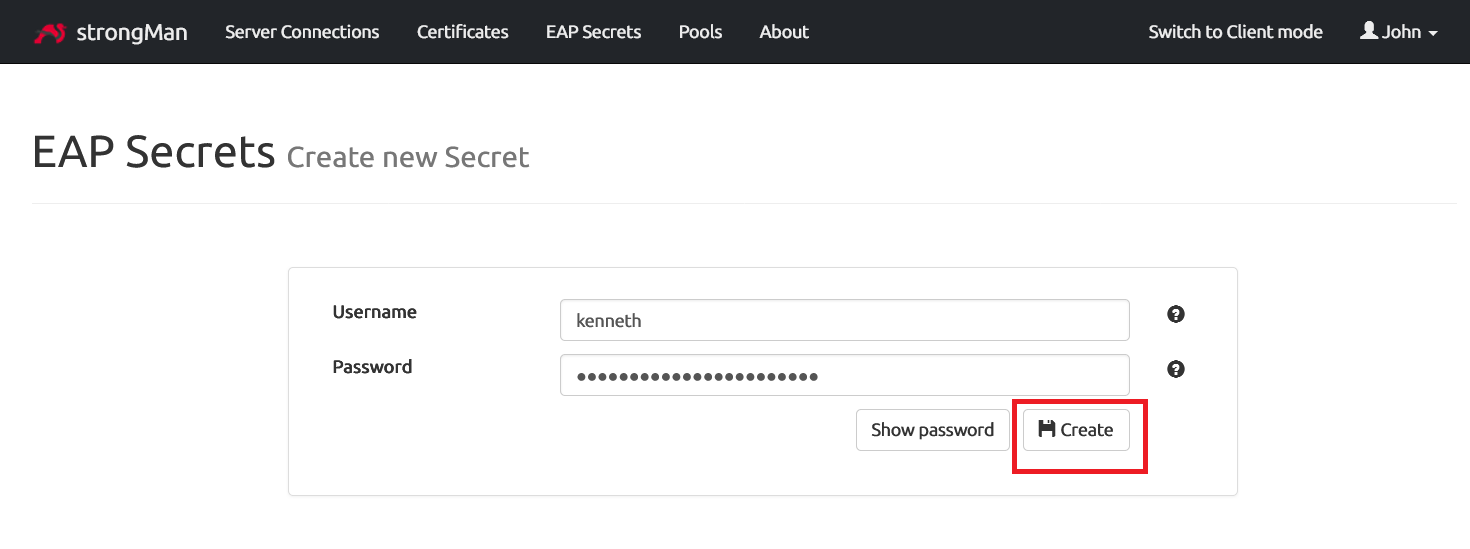
Enter the username and password that will authenticate your user. It’s recommended to type strong password and avoid common usernames like root, admin…
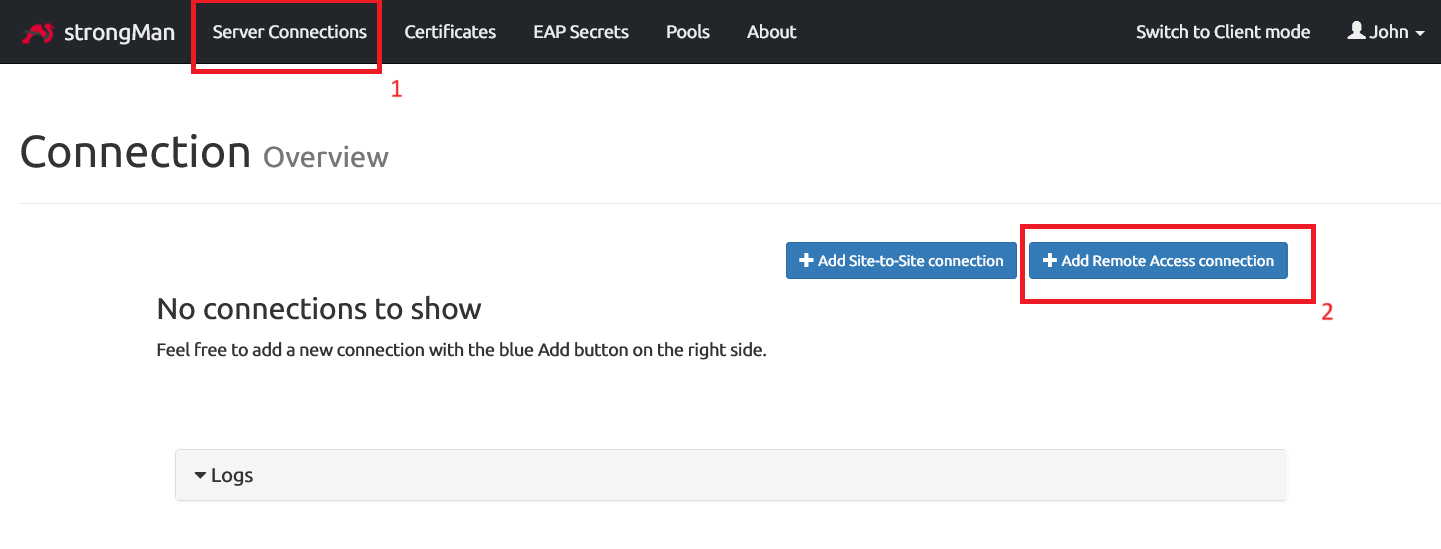
Server Connections
In the Server Connections page, we will add a Remote Access connection
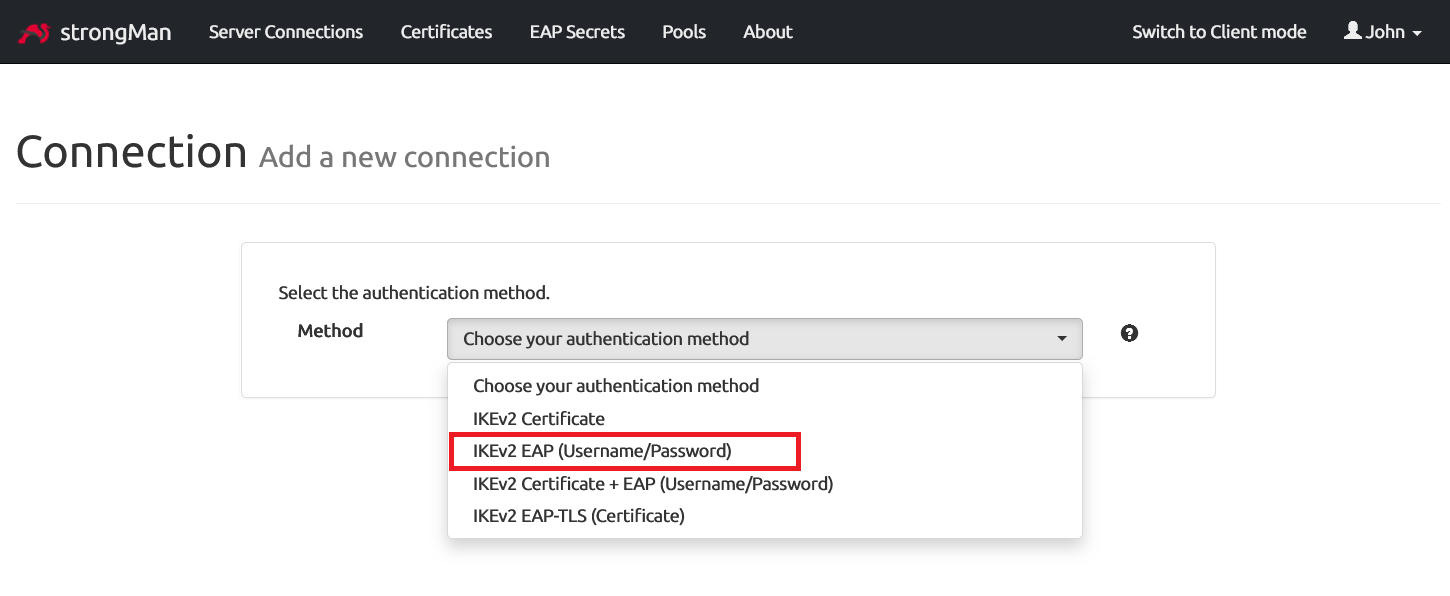
Then we select IKEv2 EAP as authentication method to allow clients to authenticate with the EAP secrets configured previously.
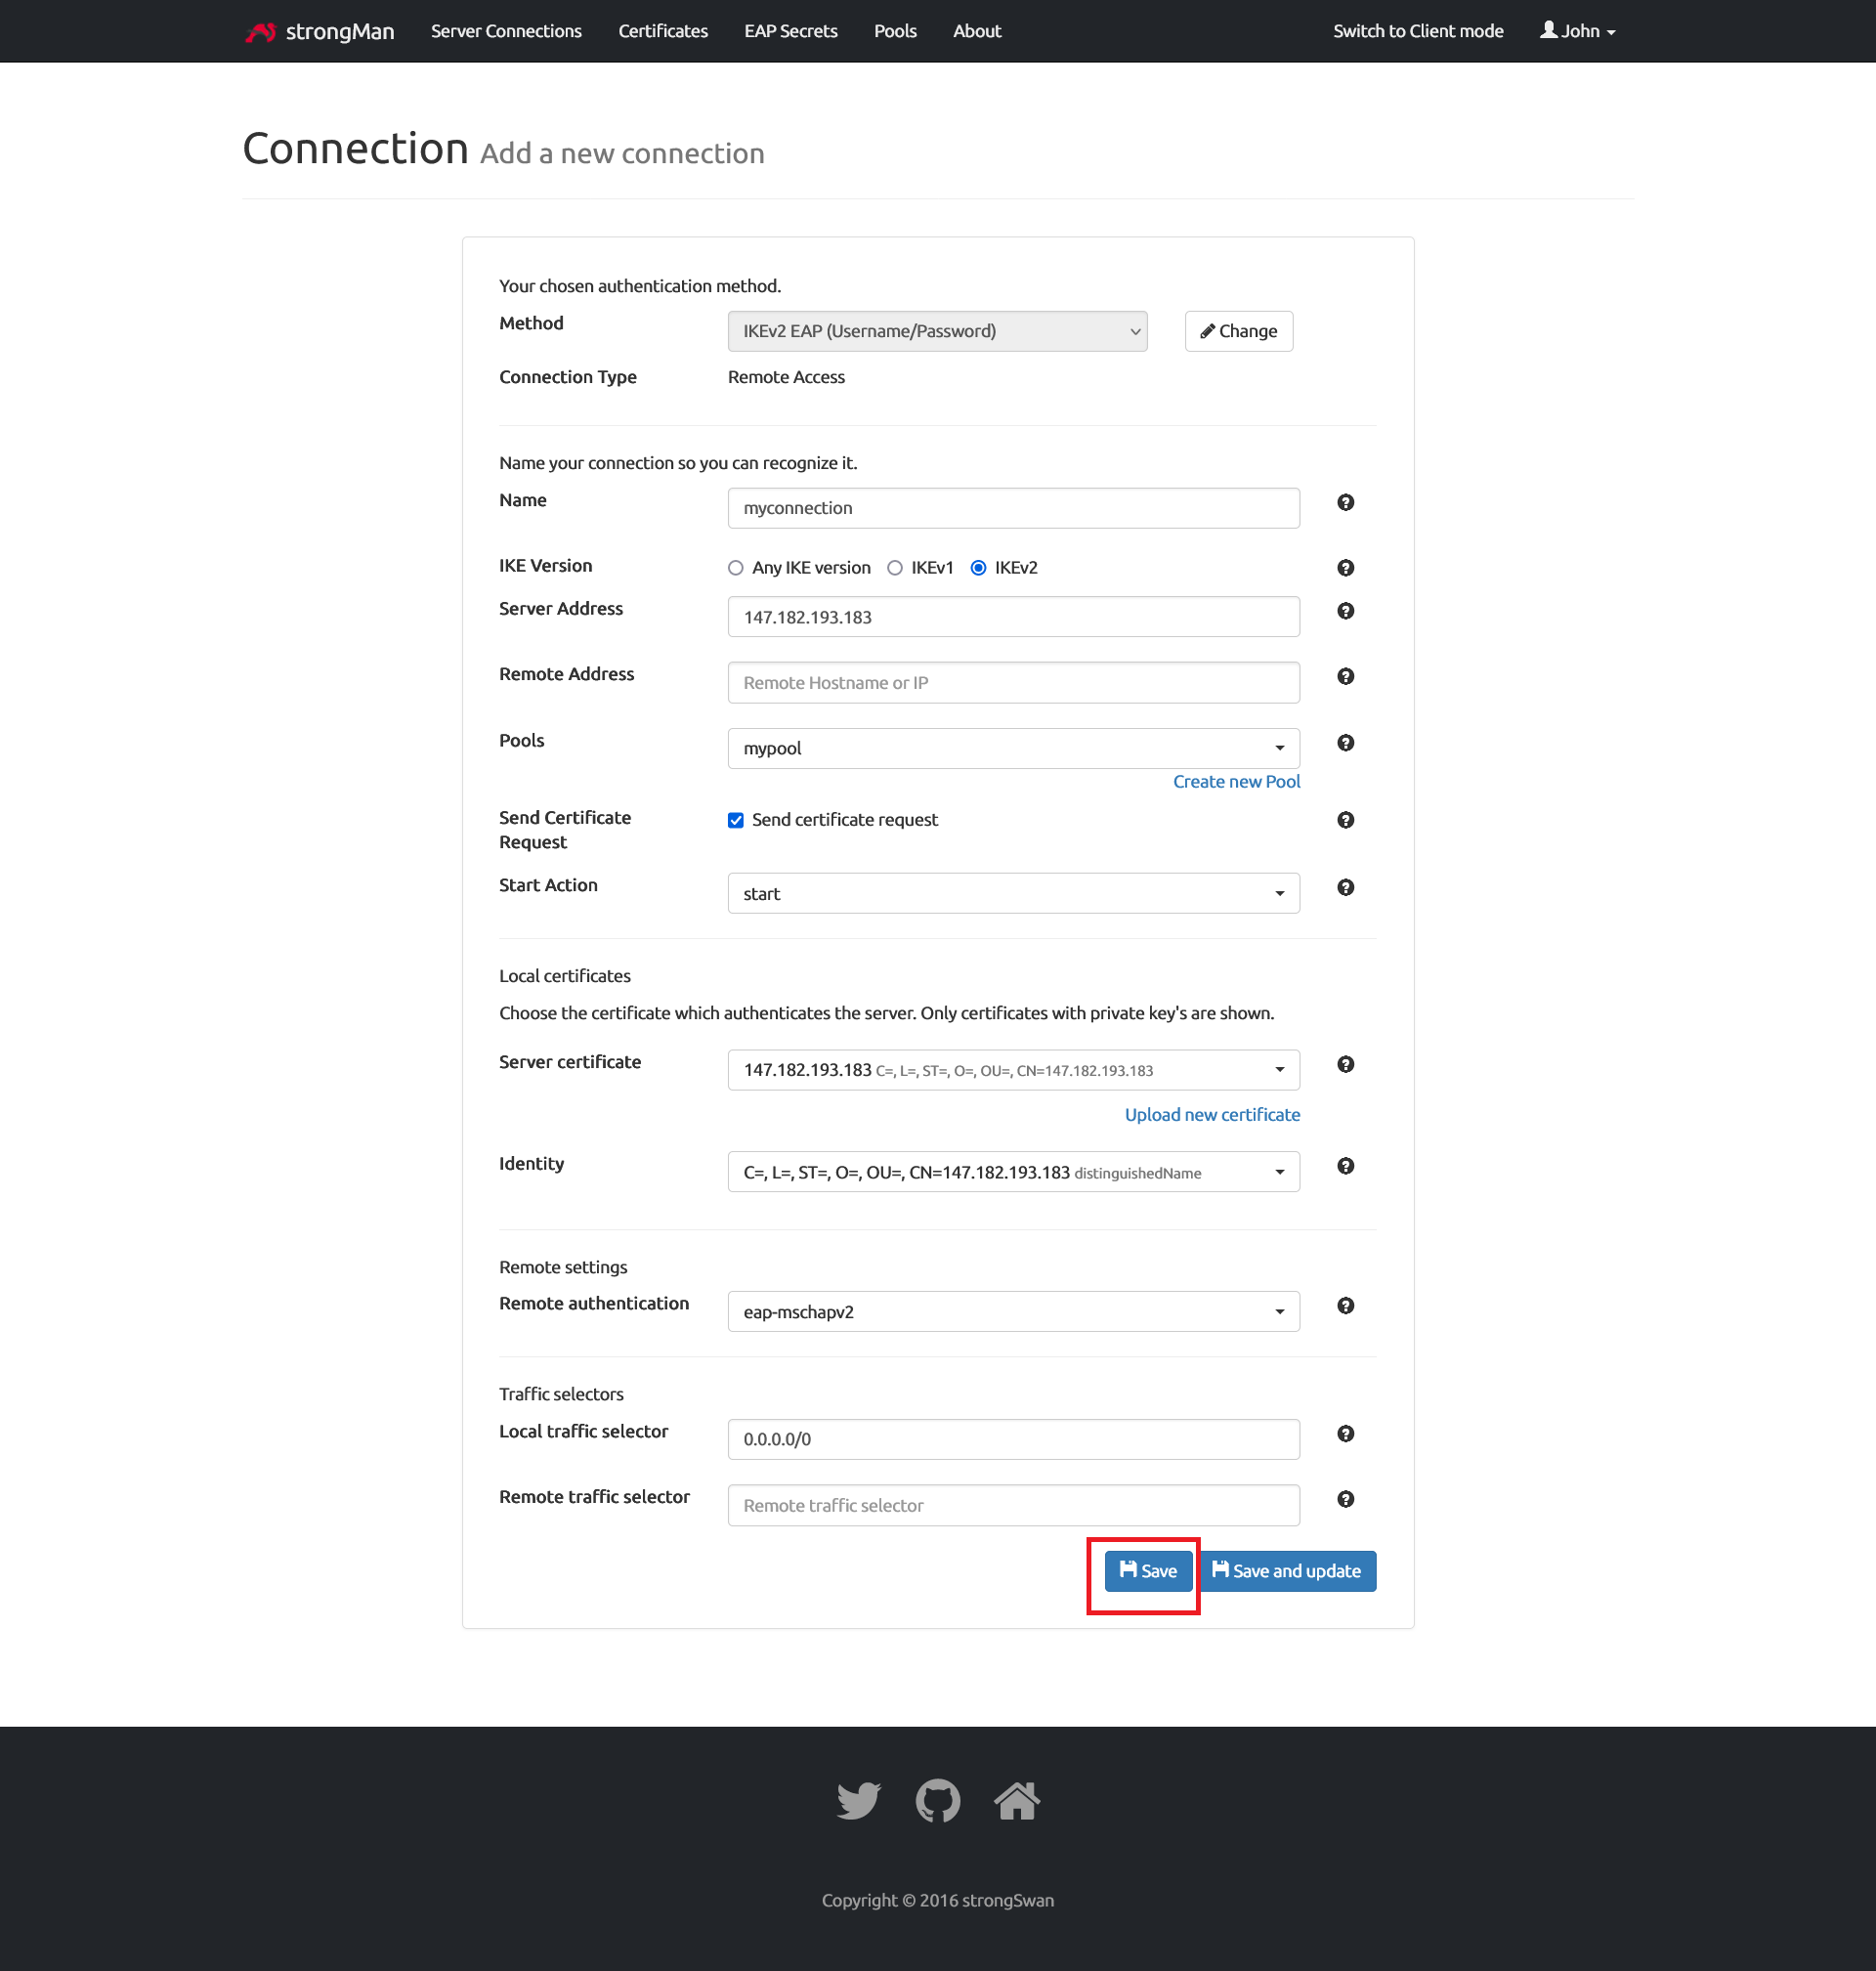
We fill in the form with details
- Name: Type any name you want
- IKE Version: Select IKEv2
- Server Address: Type your strongSwan server public IP or domain name
- Remote Address: Leave empty
- Pools: Select the pool created previously
- Send Certificate Request: check the box
- Start Action: Select start to initiate the connection actively after loading the configuration
- Server certificate: Select the server certificate uploaded in previous section
- Identity: Select one from the dropdown. Use distinguished Name in doubt.
- Remote authentication: Select eap-mschapv2
- Local traffic selector: Should be 0.0.0.0/0
- Remote traffic selector: Leave empty
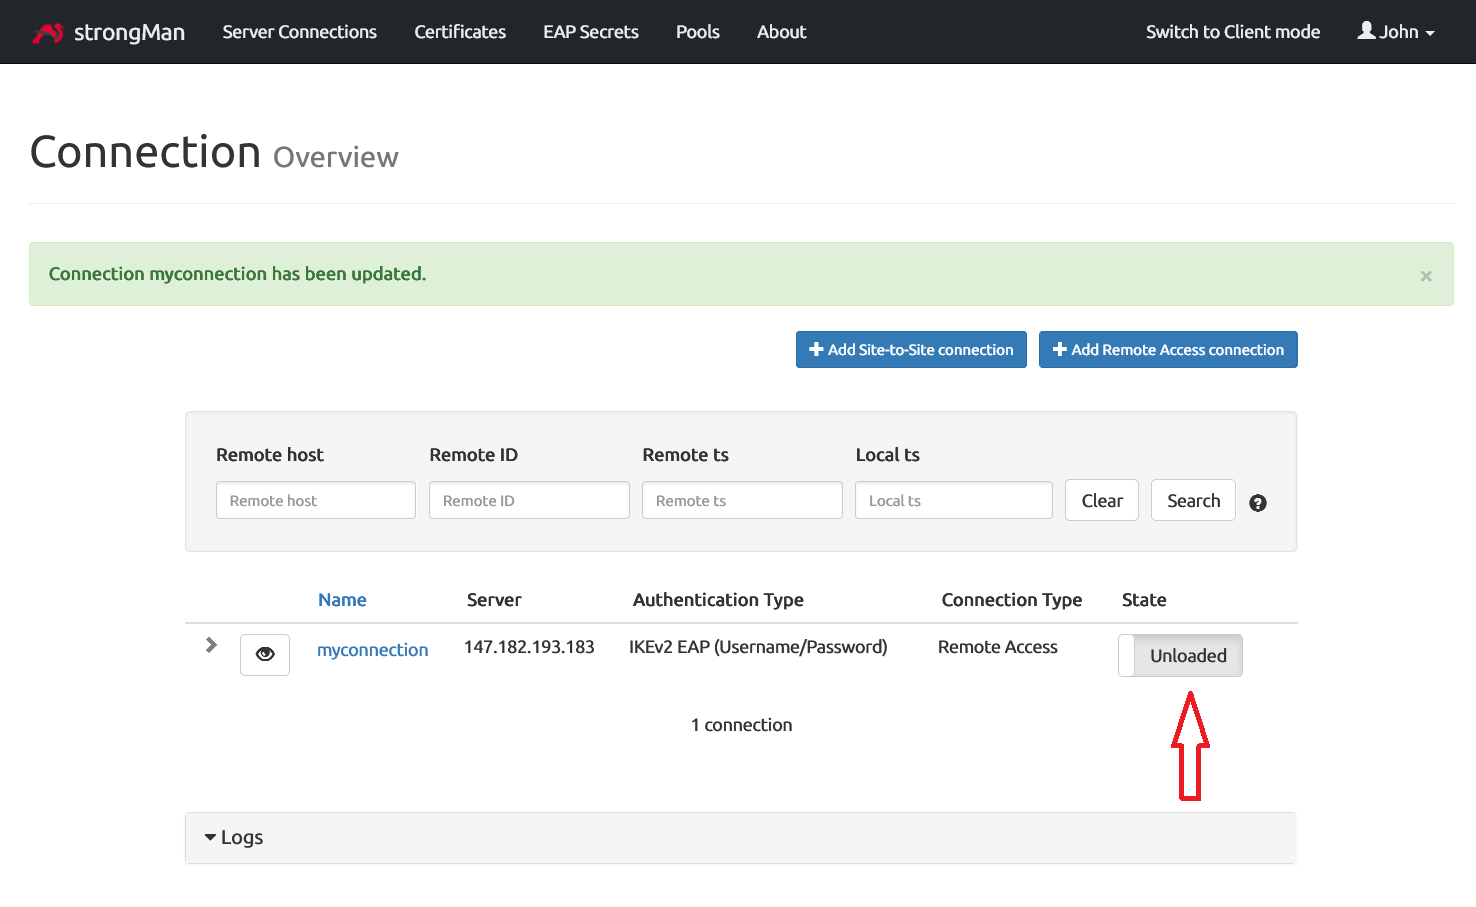
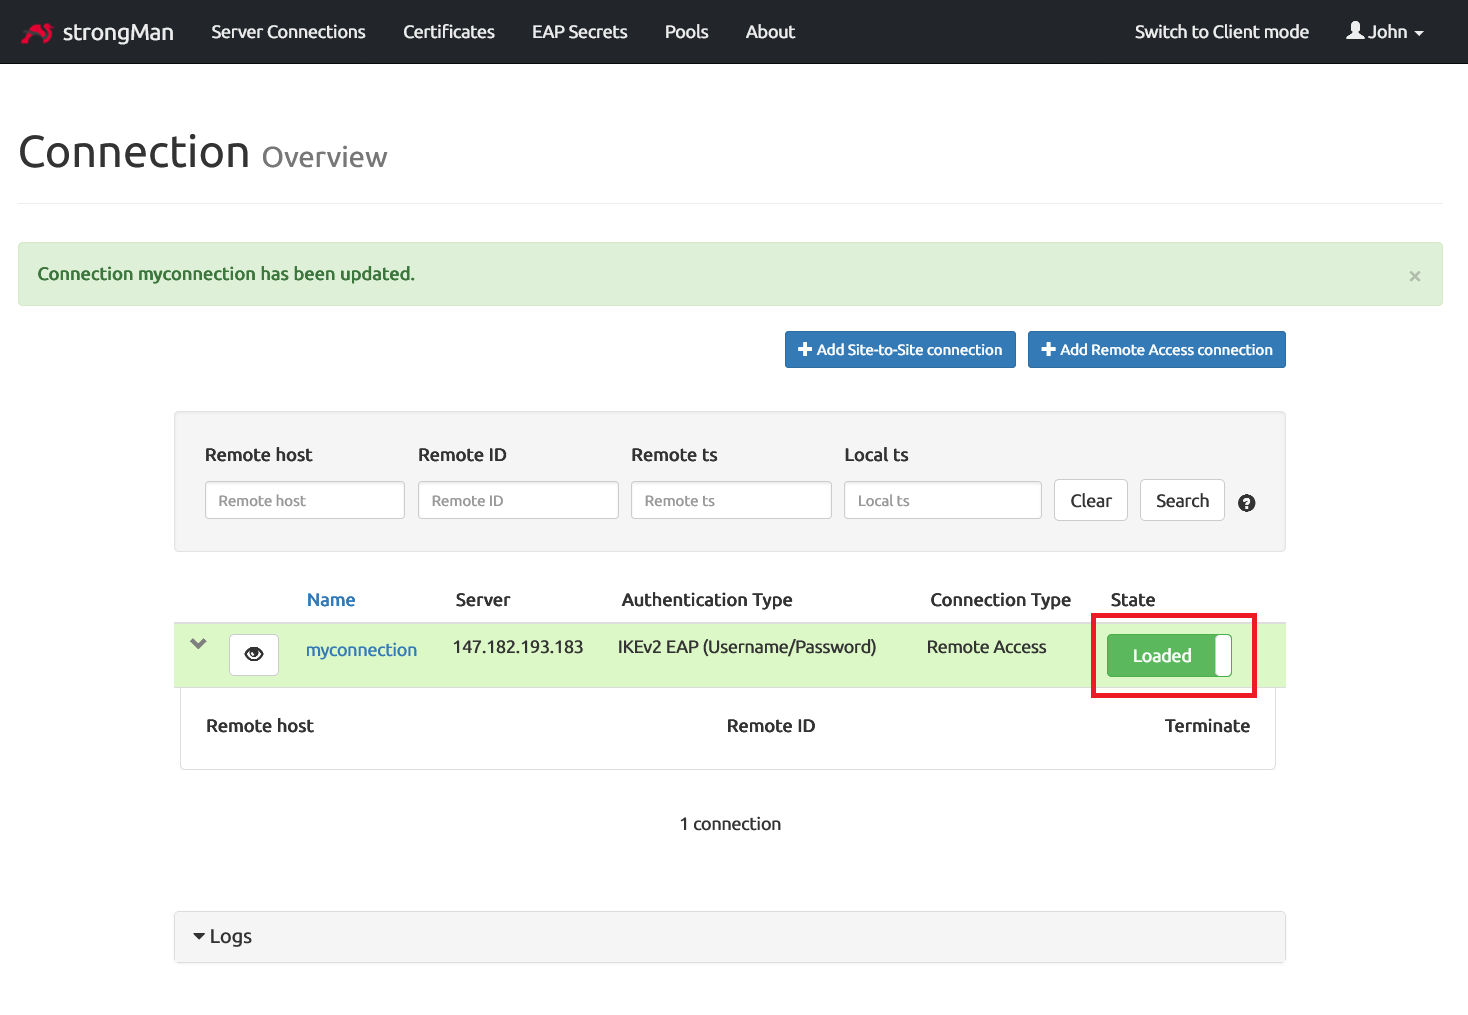
Switch the toggle to put the connection in Loaded state.
Kernel IP forwarding
Now that the VPN configuration is completed, we need to enable IP forwarding on the strongSwan server. IP forwarding is a feature that allows the Linux kernel to forward network packets from one network interface to another. In other words, if a Linux system has multiple network interfaces, enabling IP forwarding allows it to act as a router, forwarding packets between the interfaces. In our current situation, this will allow traffic movement between the VPN and the public facing network interfaces on the server.
Enable kernel forwarding with:
sysctl -w net.ipv4.ip_forward=1
echo "net.ipv4.ip_forward=1" >> /etc/sysctl.conf
Here’s a breakdown of the commands:
sysctl -w net.ipv4.ip_forward=1: This command uses thesysctlutility to dynamically change the value of thenet.ipv4.ip_forwardparameter to 1. Setting this parameter to 1 enables IP forwarding. However, keep in mind that this change is only effective until the next system reboot.echo "net.ipv4.ip_forward=1" >> /etc/sysctl.conf: This command appends the linenet.ipv4.ip_forward=1to the/etc/sysctl.conffile. This ensures that the IP forwarding setting persists across reboots. Thesysctl.conffile is read during the system startup process, and the specified kernel parameters are configured accordingly.
IP masquerading
This is required in order to provide internet access to users connected through the VPN. “IP masquerading” often referred to as “Network Address Translation (NAT) overload” is the action that ensures that the source IP addresses of the outgoing packets are replaced with the IP address of the outgoing public interface, allowing the internal network to access the internet using a single public IP address.
On Linux systems, Iptables is the command-line utility used for configuring NAT rules. We have to install it with the command:
apt install iptables iptables-persistent -y
You might be prompted during the installation to save current IPv4 rules, hit “Yes” then.

We will use the command below to configure the NAT rule:
iptables -t nat -A POSTROUTING -o eth0 -s 192.168.50.0/24 -j MASQUERADE
You may be wondering what’s going on here. Let me break it down for you:
-
-t nat: This option specifies the table to work with, and in this case, it’s thenattable. Thenattable is used for configuring NAT rules. -
-A POSTROUTING: This part of the command adds a rule to thePOSTROUTINGchain. ThePOSTROUTINGchain is processed after the routing decision has been made for a packet. -
-o eth0: This specifies the outbound network interface (eth0in this example). The rule is applied to packets going out of the specified interface. To determine the network interface used on your server for internet access, you can use theip route show defaultcommand. In the output of that command, the word afterdevis the name of your outgoing interface. -
-s 192.168.50.0/24: This specifies the source IP address range for which the rule should be applied. It should match the adresses specified during the pool configuration on strongMan. -
-j MASQUERADE: This is the action to be taken if the conditions specified in the rule are met. In this case, it’sMASQUERADE, which is a type of NAT that allows a set of source IP addresses to be mapped to the IP address of the outgoing interface.
By default, the changes made with iptables aren’t persistent and will be lost after a reboot. The command below will save the current iptables firewall configuration to a file (/etc/iptables/rules.v4).
iptables-save > /etc/iptables/rules.v4
To make these rules automatically apply on system boot, we need to ensure that iptables service is started and enabled:
systemctl enable iptables
systemctl start iptables
You can check if things are going well with:
systemctl status iptables
An output similar to this one will show up:
● iptables.service - netfilter persistent configuration
     Loaded: loaded (/lib/systemd/system/iptables.service; alias)
     Active: active (exited) since Sun 2023-12-31 02:22:17 UTC; 17s ago
       Docs: man:netfilter-persistent(8)
    Process: 31607 ExecStart=/usr/sbin/netfilter-persistent start (code=exited, status=0/SUCCESS)
   Main PID: 31607 (code=exited, status=0/SUCCESS)
        CPU: 9ms
Connect Windows 11 client
Everything is ready for users to start connectiong remotely to our VPN. So let’s test it. In this section, we will try to connect a Windows client to our VPN.
We need to download to the Windows machine, the ~/pki/cacerts/ca-cert.pem file we generated at the begining of this tutorial. If you remember, that’s the file containing the CA certificate.
Then we import it into the root certificate store on the Windows machine, making it a trusted root certificate authority. Open PowerShell as an administrator on your Windows computer and execute:
Import-Certificate -CertStoreLocation cert:\LocalMachine\Root\ -FilePath "C:\Users\kenneth\Downloads\ca-cert.pem"
Where:
-
Import-Certificate: is the PowerShell cmdlet used to import a certificate. -
-CertStoreLocation cert:\LocalMachine\Root\: specifies the certificate store where the certificate will be imported. In this case, it’s the root certificate store for the local machine, typically used for trusted root certification authorities. -
-FilePath "C:\Users\kenneth\Downloads\ca-cert.pem": specifies the file path on the Windows machine to the certificate file (ca-cert.pem) that we want to import.
The command will output something like below if ran successfully:

From now on, any certificates signed by this CA will be considered valid by the Windows client.
The command used below will create a new VPN (Virtual Private Network) connection configuration on the Windows system:
Add-VpnConnection -Name "strongMan VPN Connection" -ServerAddress 147.182.193.183 -TunnelType "IKEv2" -AuthenticationMethod "EAP" -EncryptionLevel "Maximum" -RememberCredential
Where:
Add-VpnConnection: This is the PowerShell cmdlet used to add a new VPN connection.-Name "strongMan VPN Connection": This parameter specifies the name of the VPN connection. In this case, the VPN connection will be named “strongMan VPN Connection”. You can put any name relevant to you.-ServerAddress 147.182.193.183: This parameter specifies the address of the VPN server. Replace147.182.193.183with the actual domain name or IP address of your VPN server.-
-TunnelType "IKEv2": This parameter specifies the tunneling protocol to be used. IKEv2 (Internet Key Exchange version 2) is the protocol we’re using in this article. -
-AuthenticationMethod "EAP": This sets the authentication method for the VPN. EAP (Extensible Authentication Protocol) is used in this case, which is a flexible authentication framework often used in various types of network access, including VPNs. -
-EncryptionLevel "Maximum": This parameter sets the encryption level. “Maximum” indicates that the strongest available encryption will be used for the VPN connection. -RememberCredential: This switch, when used, means that the user’s credentials will be saved. Once entered, they won’t have to be provided again for subsequent connections.
If the command is successful, there will not be any output. To confirm the VPN is configured correctly, use the Get-VPNConnection cmdlet:
Get-VpnConnection -Name "strongMan VPN Connection"
You will receive output like the following:
Name                  : strongMan VPN Connection
ServerAddress         : 147.182.193.183
AllUserConnection     : False
Guid                  : {587184F1-0047-46C7-9041-ACD0A975109B}
TunnelType            : Ikev2
AuthenticationMethod  : {Eap}
EncryptionLevel       : Maximum
L2tpIPsecAuth         :
UseWinlogonCredential : False
EapConfigXmlStream    : #document
ConnectionStatus      : Disconnected
RememberCredential    : True
SplitTunneling        : False
DnsSuffix             :
IdleDisconnectSeconds : 0
The IPsec policy must match on both the server and the client for an IKEv2 VPN connection to be successful. Unfortunately by default, none of the IKEv2 IPsec security association parameters proposed on Windows 11 clients match the ones configured on StrongSwan. So it will be necessary to define a custom IPsec security policy on the client to match the settings configured on the server.
Run the Set-VpnConnectionIPsecConfiguration cmdlet to upgrade the encryption parameters that Windows will use for the IKEv2 key exchange, and to encrypt packets:
Set-VpnConnectionIPsecConfiguration -ConnectionName "strongMan VPN Connection" -AuthenticationTransformConstants GCMAES128 -CipherTransformConstants GCMAES128 -EncryptionMethod AES128 -IntegrityCheckMethod SHA256 -DHGroup Group14 -PfsGroup none
You will be prompted to confirm the changes
Confirm
Changing the Cryptography Settings. Do you want to continue?
[Y] Yes [N] No  [C] Cancel [?] Help (the default value is « Y») : Y
That’s all!
Establishing a VPN Connection
After importing the certificate and configuring the VPN, your recently set up VPN connection will appear in the list of networks. Choose the VPN from the list and initiate the connection by clicking Connect. You will then receive a prompt to enter your username and password. Enter the required credentials, click OK, and your connection will be established.
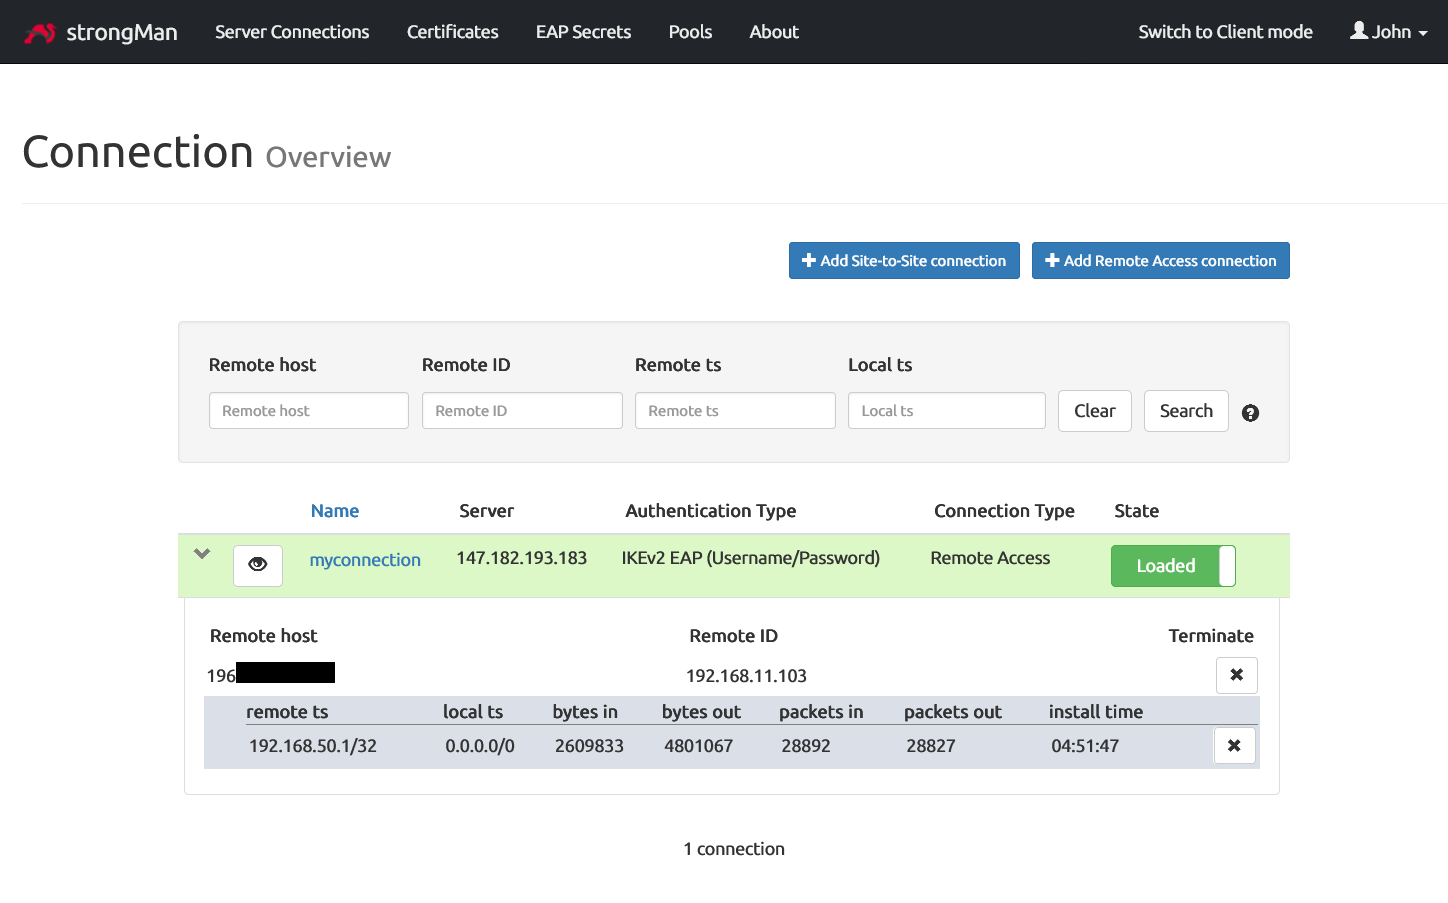
Once the connection is successfully established, that’s what it will look like from StrongMan dashboard.
Troubleshoot potential errors
If your clients have issues connecting to the VPN, you can check StrongSwan logs to figure out what’s going on. On Debian based systems, the IPSec strongSwan logs can be found in /var/log/syslog.
Thank you for reading this article all the way to the end! I hope you found the information and insights shared here to be valuable and interesting. Get in touch with me on LinkedIn
I appreciate your support and look forward to sharing more content with you in the future. Until next time!
References
The resources below have been really helpful for me to come up with this article. I want to give all the due credits to Jamon Camisso from DigitalOcean and Richard Hicks from RichardHicks Consulting.