Apache Guacamole one-click deployment in the Cloud
Apache Guacamole is an open-source remote desktop solution that allows users to connect to their computers via a web browser from anywhere. In a previous article, I demonstrated how to manually install it step by step:
Apache Guacamole manual installation with docker compose
As a big fan of the project, I’ve already been led to replicate this installation in a variety of environments: in production, in a test environment for a demo, or simply in a home lab. This made me realize that even if I knew all the deployment steps by heart, repeating them was a tedious task. So I needed a quick fix. A method for deploying Apache Guacamole with a single click on a server hosted by any cloud service provider or even on-premises. That’s how I chose Cloud-init, a technology that allows virtual machine instances to be automatically configured when they’re created.
In this article, we will look at how to use Cloud-init to deploy Apache Guacamole.
Why this choice?
Cloud-init lets you configure fundamental virtual machine settings like host name, SSH keys, network interfaces, startup scripts, packages to install, partitions to create, and more. Many cloud providers, including Amazon Web Services, Google Cloud, Microsoft Azure, DigitalOcean, and others, support it. It enables administrators like me to quickly provision large-scale virtual machines, customize them to our requirements, and get them up and running.
It’s also very simple to use.
How does it work?
Cloud-init works by injecting configuration files into newly created virtual machines. These files contain configuration instructions for the virtual machine. When the virtual machine boots up for the first time, Cloud-init recognizes these configuration files and executes the instructions contained within them.
How to deploy Apache Guacamole with that tool?
Navigate to the administration console of your chosen cloud service provider. Create a virtual machine with your preferred Linux distribution. This script has been tested successfully on the following Linux distributions (but should work on any other Linux distribution):
- Ubuntu: 18.04, 20.04, and 22.10
- Rocky Linux: 8 and 9
- Fedora: 36 and 37
- Alma Linux: 8 and 9
Then, download the guacamole.yml configuration file from this GitHub repository. When creating your machine, enter the contents of the file into the appropriate field (cloud-init, custom-data, or user-data).
Finally, wait about 10 minutes while Cloud-init configures everything. An SSL certificate-protected Apache Guacamole instance is now ready to use.
Login to the Guacamole Web UI with the default credentials:
- username: guacadmin
- password: guacadmin
Wow, amazing! What is the magic behind it?
The following actions are performed by default by the script or configuration file:
- Create a
guacamoleuseruser account with the passwordguacamolepassfor SSH access to the server terminal. - Update the packages.
- Install docker, docker-compose and all its dependencies.
- Create the appropriate files (
docker-compose.yml,haproxy.cfg, and so on) in the/home/guacamoleuser/docker-stackinstallation directory.
If you are wondering what these files do, see my Apache Guacamole manual installation with docker-compose blog post. - Determine your server’s IP address and make Guacamole accessible through the URL
https://141-80-202-45.traefik.me/guacamole, assuming141.80.202.45is your machine’s IP address.
The IP address shown above is just an example. The script will change the URL to reflect your server’s actual address. - Obtain and install a Let’s Encrypt SSL certificate. (thanks to traefik.me)
Although this configuration file does not require any changes from you, there are a few settings that you should specify or change:
fqdnisn’t in the configuration file, but it is required if you want to access Guacamole with a dedicated domain name. For the domain, a self-signed SSL certificate will be generated automatically.ssh_key, which represents the SSH public key used to access your server’s terminal.default_user_passtheguacamoleuser’s passwordpostgres_passwordis the database password used by Apache Guacamole. The default value isgcZYye@7U89JF%.
A file sample with the previously mentioned parameters defined:
## template: jinja
#cloud-config

{% set default_user = "mycustomuser" %}
{% set fqdn = "guacamole.company.local" %}
{% set ssh_key = "ssh-rsa AAAAB3NzaC1yc2EAAAADAQABAAABAQDP5TnKCkr+Lzdxe5QHpT0210ZFedlMyuW1jPvVnRcyPDBJCSfgPDtSajJQ745uRD4RL1PsLwn+fwIYPR1XHCMXJvZFAENtK66ZRy+EeniAiLdmTe4EqFzzX9PDmQwFvvRIL6RYNdJ8pSlv94wINkg27Fu0h7JVsahwlz44q4rPThglW3N9Yblsth0jcGG6ZkgTHMS9w3OamDm4hatE9PLqsTMR8YmpZXjJNIJf3b8rnjVQVmGwnG3bhSAkHiR+T2VN1j5yywkaCYr31cagg7RxhoWI06ksvwf+yoGJBNbHYxnym+JdgsCoTyeRQc5pHZR2jqJ0UthRCOhzIVQ3eO35" %}
{% set postgres_password = "9a@cGCvdn&k6FP" %}

...
Aside from these parameters, there are a few others that you might want to edit depending on your needs.
postgres_userGuacamole Postgres database user. The default value isguacamole_db_userpostgres_versionGuacamole Postgres database docker container version. The default value is15.0installation_paththe folder to house all the config files for docker, guacamole and HAProxy. The default value is/home/guacamoleuser/docker-stack. Notice that path does not have a trailing/guacamole_frontend_versionguacamole docker container tag. The default value is1.5.0guacamole_backend_versionguacd docker container tag. The default value is1.5.0haproxy_versionhaproxy docker container tag version, the default value is2.4dockercompose_versionthe docker-compose.yml file version to use, default value is3.9
Deployment scenario example
For those who are unfamiliar with cloud provider consoles, examples of what the experience should look like for some cloud providers are provided below.
Deployment on DigitalOcean
To deploy Apache Guacamole on a droplet (virtual machine) hosted on DigitalOcean using Cloud-init, follow these steps:
- Log in to your DigitalOcean account and go to the Create menu on the top right-hand side of the page.
- Select Droplets from the dropdown menu.
- Choose the image you want to use for your Droplet. It’s important to select an image that supports cloud-init. You can find this information in the image details.
- Choose the Droplet size and the region where you want to deploy your Droplet.
- Select Advanced Options section, check Add Initialization scripts (free) box. Paste the
guacamole.ymlfile content into the User data text box. - Once you have entered your cloud-init script, click on the Create Droplet button at the bottom of the page.

Deployment on Azure
To deploy Apache Guacamole on Azure using Cloud-init, follow these steps:
- Log in to the Azure portal and click on the Create a resource button.
- Search for Ubuntu Server or your desired Linux distribution, and select the appropriate image.
- Choose the size of your virtual machine and other configuration settings, such as storage and network options.
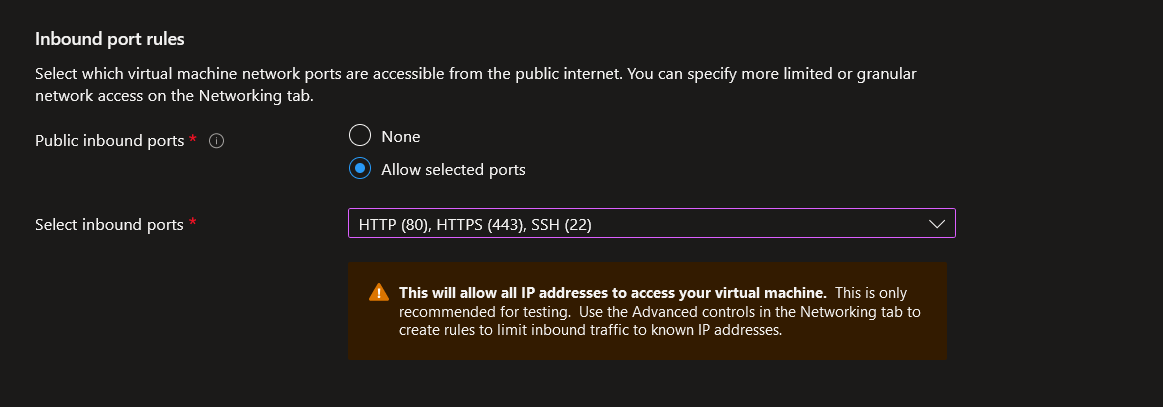
Don’t forget to allow inbound HTTP and HTTPS traffic.

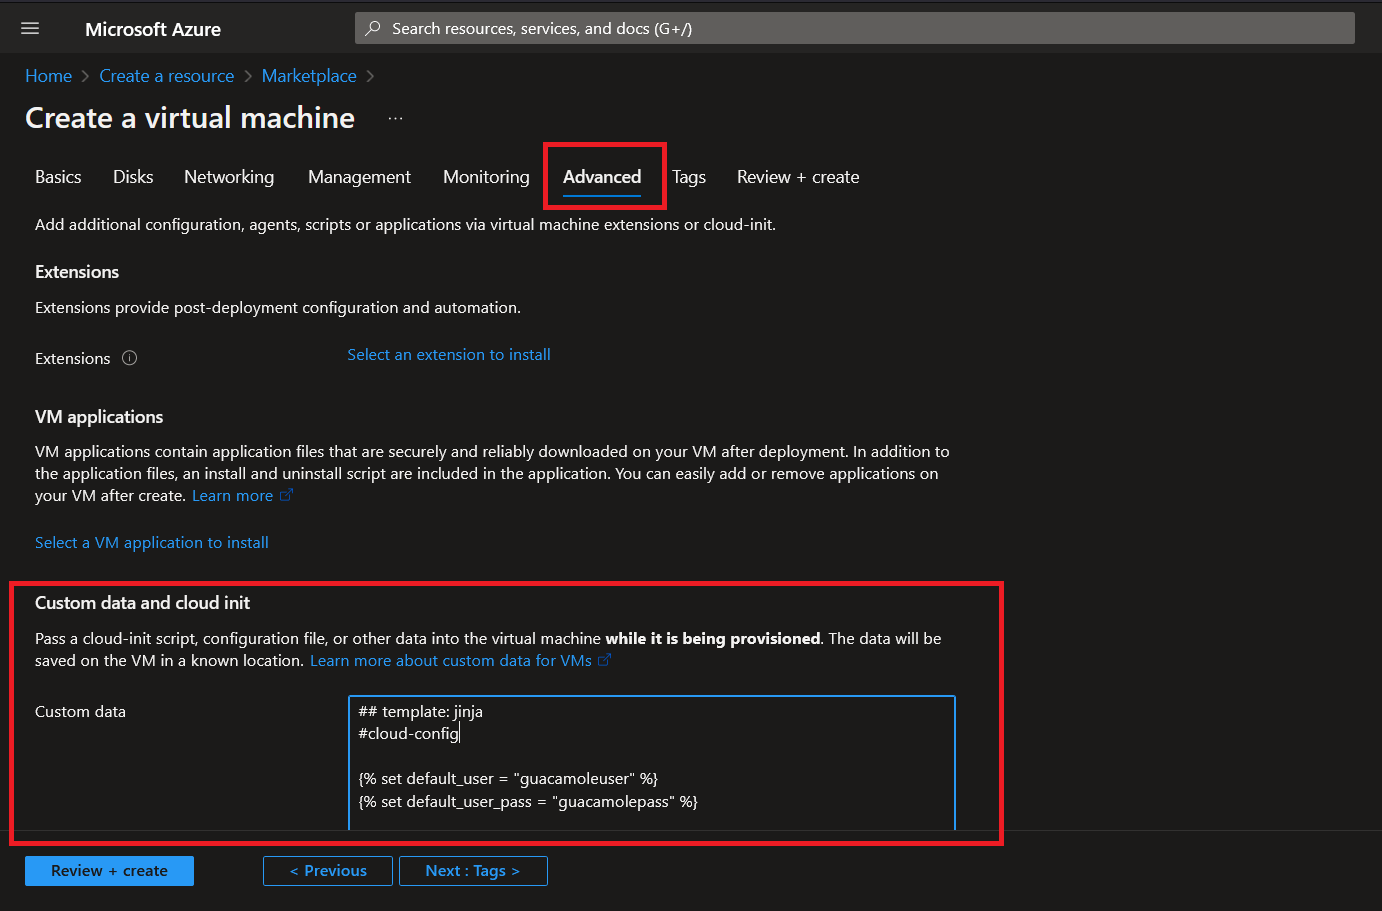
- Under the Advanced tab, paste the
guacamole.ymlfile content in the Custom data box. - Click on Review + create to review your configuration settings, and then click on Create to deploy the application.

Validation / Troubleshooting Steps
Connect to the server terminal using the login credentials defined in the previous sections to ensure the deployment went smoothly or to diagnose any errors. The ssh command ssh guacamoleuser@<your-ip> would normally do the trick.
If everything is working properly, the docker ps command should show you all the containers that are running.
$ docker ps
CONTAINER ID   IMAGE                            COMMAND                  CREATED             STATUS                       PORTS                                                                                                                 NAMES
4d276df73b65   guacamole/guacamole:1.5.0        "/opt/guacamole/bin/…"   About an hour ago   Up About an hour             8080/tcp                                                                                                              guacamole_frontend
f98888a427d9   postgres:15.0                    "docker-entrypoint.s…"   About an hour ago   Up About an hour             5432/tcp                                                                                                              guacamole_database
5e27f52d8a98   guacamole/guacd:1.5.0            "/bin/sh -c '/opt/gu…"   About an hour ago   Up About an hour (healthy)   4822/tcp                                                                                                              guacamole_backend
d02031e42fb3   haproxytech/haproxy-alpine:2.4   "/docker-entrypoint.…"   About an hour ago   Up About an hour             0.0.0.0:80->80/tcp, :::80->80/tcp, 0.0.0.0:443->443/tcp, :::443->443/tcp, 0.0.0.0:8404->8404/tcp, :::8404->8404/tcp   haproxy
Check the status of Cloud-init with the command cloud-init status in case of error.
$ cloud-init status
status: done
If the status displays status: running, it means that the deployment has not yet completed and is still in progress. Please be patient. Installation time may vary depending on network connectivity, server performance, cloud provider, and other factors.
However, if the status displays status: error, check the Cloud-init logs.
These logs contain detailed information about the steps Cloud-init took during the virtual machine configuration. Depending on the Linux distribution, the logs can be found in various locations. For example :
- The
/var/log/cloud-init-output.logfile contains the output messages from Cloud-init when the startup scripts or configuration modules are executed. While Cloud-init is running, use the commandsudo tail -f /var/log/cloud-init-output.logto view the various steps of the deployment process in real time. - The
/var/log/cloud-init.logfile is another log file that contains detailed information about the internal Cloud-init configuration process. It contains information about the virtual machine such as the Cloud-init version, instance ID, instance type, region, and availability zone.
It also includes information about the Cloud-init modules that were run, as well as any errors that occurred during their execution.
Other potential errors
A self-signed SSL certificate will be generated automatically if you use a custom domain name via the variable {% set fqdn = "<your domain>" %}. As a result, receiving an error message similar to the one below is completely normal. Please disregard it.

If you get an HTTP 404 error, please make sure to add /guacamole to the URL in your browser. Indeed, Guacamole is not accessible at the root / of your domain name, but rather at https://<your fqdn>/guacamole

Reference
I would like to give all due credits to Nathan Catania, a guy who wrote an excellent article on Apache Guacamole deployment. It highly inspired me to come up with this blog post. Check out his work here:
https://nathancatania.com/posts/deploy-guacamole-ssl-saml/
Thank you for reading this article all the way to the end! I hope you found the information and insights shared here to be valuable and interesting.
If you have any questions, comments, or suggestions, please don’t hesitate to get in touch with me on the following platforms:
I appreciate your support and look forward to sharing more content with you in the future. Until next time!